
Linux系统--实现天垓100支持部署模型
Linux 系统实现天垓 100 支持部署模型
最近在研究大模型训练,硬件环境为飞腾 5000C + 天垓 100 的国产服务器,操作系统是麒麟。由于系统封闭、很多依赖无法更新到最新,尤其在宿主机环境调试时被“折磨”了两天。最终通过使用天数官方提供的 Docker 容器,顺利完成部署。
本文记录整个过程,供后续复现和排查问题参考。
宿主机环境准备
- 安装 Python 和 pip
1 | yum install python3-pip |
- 安装 opencv-python
1 | pip3 install opencv-python -i https://pypi.tuna.tsinghua.edu.cn/simple |
- 安装 opencv-contrib-python(带扩展模块)
1 | pip3 install opencv-contrib-python -i https://pypi.tuna.tsinghua.edu.cn/simple |
- 验证安装
1 | python3 -c "import cv2; print(cv2.__version__)" |
常见错误与解决方案
❌ 错误 1:pip 下载超时
1 | socket.timeout: The read operation timed out |
✅ 解决:
使用清华源安装(-i 参数);
建议 Python 版本 ≥ 3.8,提高兼容性。
❌ 错误 2:找不到 libGL.so.1
1 | libGL.so.1: cannot open shared object file: No such file or directory |
✅ 解决:
1 | apt-get install -y libgl1-mesa-glx |
❌ 错误 3:找不到合适版本的 numpy
1 | Could not find a version that satisfies the requirement numpy>=1.23.5 |
✅ 解决:
1 | # 降级安装指定版本 |
YOLOv5 安装与测试
由于宿主机依赖不全,直接运行 YOLOv5 报错,转而使用 Docker 容器部署,最终通过天数官方容器成功调用天垓 100 算力卡。
容器镜像地址:
👉 天数容器镜像:下载地址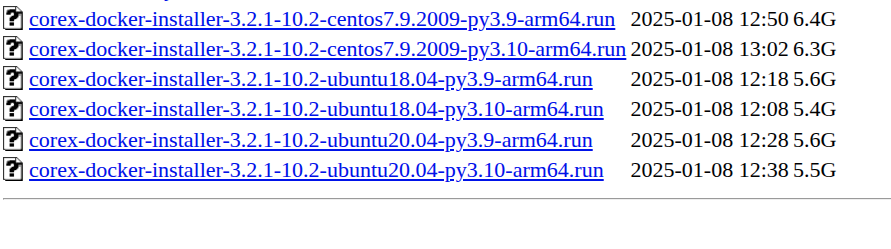
本文选择的是buntu20.04-py3.10-arm64
📄 详细步骤参看本博客另一篇文章Linux系统-安装YOLOv5
快速部署流程
- 安装 Miniconda(如尚未安装)
1 | wget https://repo.anaconda.com/miniconda/Miniconda3-latest-Linux-aarch64.sh |
- 克隆 YOLOv5 项目
1 | git clone https://github.com/ultralytics/yolov5.git |
- 安装依赖
1 | pip3 install -r requirements.txt -i https://pypi.tuna.tsinghua.edu.cn/simple |
- 下载模型权重
1 | wget https://github.com/ultralytics/yolov5/releases/download/v7.0/yolov5s.pt |
- 运行测试
1 | python detect.py --weights yolov5s.pt --source ./zidane.jpg |
安装天数 Docker 容器
下载 .run 安装器后放在宿主机目录下,执行:
1 | # 确认文件名称正确 |
安装界面弹窗无需选择任何选项,直接继续安装。
⚠️ 如果报错提示 Docker 未启动:
1 | # 启动 Docker |
- 安装其他依赖库(可选)
1 | pip install scikit-learn joblib seaborn thop ipython gitpython |
验证环境是否配置成功
1 | # OpenCV |
相关推荐

2026-01-28
Linux系统--在线更新ubuntu系统
记录Ubutu20.04升级到22.04最近一段时间在安装一些软件时,经常会报一些依赖库错误,尤其LibC版本错误,原因是ubuntu20.04的libc版本过低,导致无法安装一些依赖。20.04到现在已经五年了,索性升级一下系统。 升级系统原本想直接替换软件源升级部分依赖,但是发现会可能会导致一些版本不兼容错误,最好是直接升级系统 修改软件源Ubuntu 不同版本有专属的代号(20.04=focal、22.04=jammy),这里先把本地源替换成阿里云源,方便国内网络访问下载。如果能访问官方源,可以跳过此步骤。 123456789deb http://mirrors.aliyun.com/ubuntu/ focal main restricted universe multiversedeb http://mirrors.aliyun.com/ubuntu/ focal-security main restricted universe multiversedeb http://mirrors.aliyun.com/ubuntu/ focal-updat...

2025-10-16
Linux系统--硬盘分区属性与双系统安装
硬盘分区属性与双系统安装在生活中,许多人希望在同一电脑上安装多操作系统,如windows和linux,兼顾工作和娱乐。本文介绍硬盘的分区属性,以及如何进行双系统安装。 分区属性和引导方式GPT和MBR分区表的区别关于GPT(GUID Partition Table): GPT 是较新的分区表格式,全称为 GUID 分区表(GUID Partition Table)。与传统的 MBR 相比,GPT 拥有更强的灵活性与扩展性。 优点是支持2TB以上的大硬盘;每个磁盘的分区个数几乎没有限制,分区大小也几乎没有限制;通常与 UEFI 启动模式 配合使用。目前主流的操作系统都用该方式 关于MBR(Master Boot Record):MBR分区表(master boot record)的英文缩写,简称主引导记录,还可以叫做主引导扇区。它的运行机制存在于硬件的基础之上,它存储在硬盘的第一个扇区上。 优点就是兼容性比较好,适用于旧版 BIOS 系统;缺点就是不支持管理大硬盘结构,最大仅支持 2TB 容量。 UEFI和Legacy引导方式的区别Legacy引导方式:Legacy模式使用MBR...

2025-07-09
Linux系统--更新软件源
Linux系统 更新软件源目前主流的Linux系统分Redhat系和Debian系,其中Debian系有Ubuntu、Kali、Debian等,Redhat系有CentOS、RHEL、OpenSUSE等。以下主要分析Ubuntu和Centos系统为例。 Ubuntu系统Ubuntu在国内应用比较广泛,并且官网还一直提供免费的维护服务,因此Ubuntu的官方源可以直接访问下载软件,只不过可能访问速度比较慢,这里介绍如何将Ubuntu的官方源替换为国内镜像源。 源的构成源列表语句构成:软件包格式 + 源地址 + 版本代号 + 组件分类 例如:deb http://mirrors.aliyun.com/ubuntu/ focal restricted 软件包构成 deb:表示这是一个二进制软件包的源,是.deb格式,适用于大多数用户。 deb-src:则表示是源代码包的源,适用于开发者或需要自己编译软件的人。 源地址 国内常用镜像还有清华、中科大、网易等。镜像源的URL地址,可以使用http、https或者ftp等协议。以下这个地址是阿里云的 Ubuntu 镜像站点。 示例:htt...

2023-04-13
Linux系统--定时任务配置
配置定时任务1、使用crontab -e 在后面增加指令注意,这个仅仅为该角色下配置的定时任务 2、vim /etc/crontab 在后面增加指令 crontab具体语法:如有多个不同时间需求,需使用”,”隔开 123456789* * * * *- - - - -| | | | || | | | +----- 星期中星期几 (0 - 6) (星期天 为0)| | | +---------- 月份 (1 - 12) | | +--------------- 一个月中的第几天 (1 - 31)| +-------------------- 小时 (0 - 23)+------------------------- 分钟 (0 - 59) 指令语法示例如下: 1234567891011121314151617181920212223242526272829303132333435实例1:每1分钟执行一次myCommand* * ...

2026-03-16
Linux系统--openclaw安装
Ubuntu20.04安装部署openclaw记录openclaw是一个可快速搭建AI助手网关的项目。这项目年前就在github上关注过,当时小星星增长很快,没想到春节后也是火了,最近也是花时间简单部署了下。为此还升级了下服务器的带宽,感兴趣可以直接参考我的步骤。 openclaw 安装准备我使用的是QQ机器人+阿里百炼Qwen大模型。 安装前必须先准备:QQ 机器人开发者账号与 Token阿里百炼 /DashScope API-KEY QQ机器人1、先登陆qq开放平台,用QQ扫码登陆后。 2、选择“创建机器人”,然后简单填写信息即可。创建成功后,在页面你会看到机器人的AppID和Token,这两个信息后面会用到。 3、第一次创建还会提示你安装openclaw时,需要先安装插件,信息如下: 123456789# 安装QQ Bot插件(下面最新)#openclaw plugins install @sliverp/qqbot@latestopenclaw plugins install @tencent-connect/openclaw-qqbot@latest# ...

2023-06-22
Linux系统--增加开机启动服务
自启服务根据systemd工具,增加开机启动服务 步骤1、编辑 /etc/systemd/system/my-test.service,没有这个文件就创建一个: sudo touch /etc/systemd/system/my-test.service 2、然后编辑文件: sudo vi /etc/systemd/system/my-test.service 123456789101112131415161718# 条件会判断该路径文件,不存在则报错[Unit]Description=/etc/my_test CompatibilityConditionPathExists=/etc/my_test# 服务配置路径、优先级、日志输出[Service]Type=forkingExecStart=/etc/my_test startTimeoutSec=0StandardOutput=ttyRemainAfterExit=yesSysVStartPriority=...
评论